Stay informed!
Subscribe to the newsletter and stay informed with the latest updates and important news directly in your inbox.
No spam. Unsubscribe at any time.
Subscribe to the newsletter and stay informed with the latest updates and important news directly in your inbox.
No spam. Unsubscribe at any time.
This tutorial explains how to point a domain name to a different web hosting provider by changing the nameservers. This is particularly useful if you’ve purchased web hosting from one provider while your domain name is with another. You could transfer the domain name to the provider where your web hosting package is located, but that may not always be your preference. In such cases, updating the nameservers is a great alternative and easier than you might think.
Let’s get started!
NOTE: This tutorial guides you through the process of pointing a domain name stored at Hostinger to web hosting at Cloud86. Keep in mind that this process can also be applied vice versa or with different hosting providers.The first step is to find the nameservers of Cloud86. Navigate to their website and log in with your account. Go to “My Services” and click on the web hosting plan you want to add the domain to. This will take you to the “Product Details” page. Scroll down to find a tab with hosting information, including the nameservers.

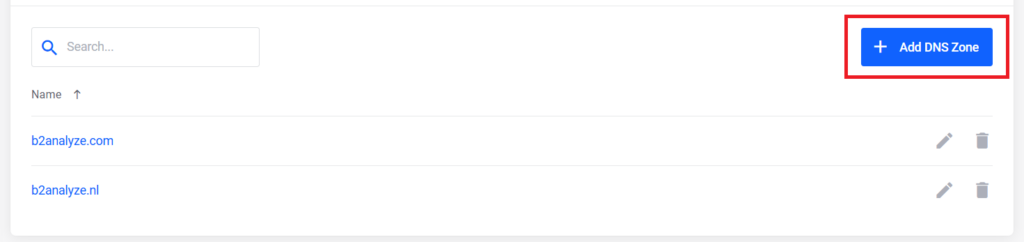
Before navigating to the Hostinger website, make sure that the domain name is added to the DNS Zone of your web hosting plan in Cloud86. On the “Product Details” page, scroll back to top and click on “Manage DNS”. This will bring you to the DNS Manager page. Click on “Add DNS Zone” and enter the domain name without the “www.” prefix.
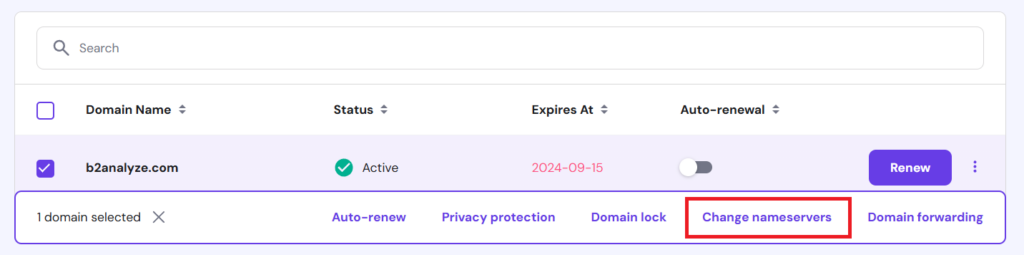
NOTE: This tutorial assumes you are using a domain name without web hosting assigned to it. If you have an existing website on your domain, you'll need to migrate the website first before proceeding to the next step. You may also need to update the DNS records. If you're unsure of what to do, hosting providers like Cloud86 and Hostinger offer free migration services with certain packages.Now that everything is set up in Cloud86, the next step is update the nameservers in Hostinger. Navigate to their website and log in with your account. Go to “Domains” and click on “Domain Portfolio”. Select your domain name and click on “Change Nameservers”
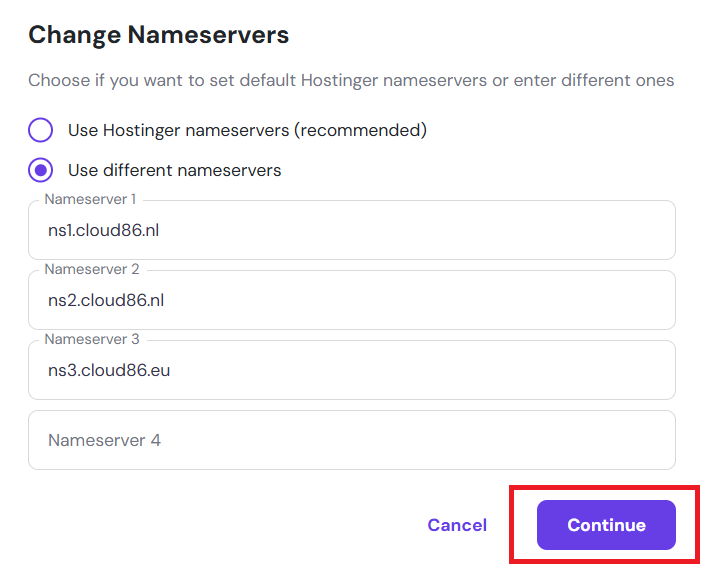
Choose “Use Different Nameservers,” then copy and paste the nameservers of Cloud86.
When you change your domain’s nameservers, it takes time for DNS servers around the world to recognise the update. This process, known as “DNS propagation”, can take up to 48 hours but generally completes within 2-3 hours. If you’re interested, you can use an online tool like DNS Checker to monitor the progress.
That’s it! You can now start using your domain name with a hosting package from another provider.